


Illustration Lesson Week One: Character
Hello! I'm so glad you’re here and that I'll get to work with you for the next 3 weeks! I'm excited to share what I've learned in my thirty year obsession with children's books, so thank you and welcome to Illustrating Books for Children! I hope this course inspires you in creating your own children's books. I've put together a collection of books that I think are exceptional and are a good example of each week’s theme—I’ll include a book list at the end of the lesson. Post your progress in the Facebook group, and please give positive feed back to each other and I will as well! :) You're welcome to share your work on social media and you can tag it: #illustratingbooksforchildren. Please don't share the course content, however, I worked hard to put this together. Thank you!
You will have or already have your own way of working on your books. I will share the way I work on mine and you will discover what works for you. I often find that book projects can feel a bit chaotic as a variety ideas and images present themselves. Change of an idea or image inevitably affects the rest of the book, often leading to unexpected consequesnces.
This week includes:
• How I make a dummy or a working protype of the book.
• How the physical form of a book can tell a story.
• Examples of children's book characters and elements that help identify who they are.
• Your assignment
• Resources
The Book Dummy
I like working with a book dummy because as you turn through the pages it's obvious what is working and what is not. My heart does a little dance when the book is working and throws little jabs at me when it's not. (Tip: read to the age appropriate audience for insight on what's working and what is not—it's amazing the clarity that comes to you when sitting with a 4 year old.) I keep reworking my book dummies until they're tight, feel fluent and don't "jab" at me as I read through them.
The real secret is to get the ideas out of your head and on paper right when they arrive. Record your ideas with more detail than you think you will need. You should have a place to put your ideas as soon as they come to you. Lately I have been using one of those storyboarding journals from Moleskine, but here are a few more options for capturing your ideas: (note: Click for download of pdfs and the dummy for the dummy making lesson.)
1) Picture book layout thumbnail page.
2) 9 page pdf indicating spreads for a 32 page picture book.
3) How I make a dummy.
4) I tape pages on the wall as a layout of the whole book and tape my sketches into place.
•orange pages are: front and back cover
•white: endpapers
•green: the book starting page 1 and ending page 32
1

2

3

4

You can see by looking at books what the general children book sizes tend to be. You'll want to keep in mind how it will fit on a shelf (too small and it gets lost—too big and it doesn't fit) or how it fits in a child's hands. That said, if your idea calls for something unusual—then give it a try and follow your gut.
A 32 page picture book is most common. It used to be that publishers didn’t stray much from this page count, but more and more there are picture books that exceed 100 pages. (note: Added or subtracted pages need to be in multiples of four.) Here are three examples of picture books with longer page counts that are in the market now.

48 pages

104 pages

112 pages
The Form of a Book Tells a Story
A horizontal format, a square format, or a vertical format each has it's own unique qualities. A horizontal format feels more at rest. It also re-enforces reading from left to right; it makes a linear journey. A square is playful where a vertical format can feel more formal, especially when paired with a formidable subject. Surprise and clever design delights the reader and encourages creative thinking. I want to share some books with you that use the actual form of the book as storytelling. These artists keep a broad view of what a children’s book is to create something new and exciting—pay attention to the narrative quality. Before you continue, take a piece of paper to jot down any fleeting ideas that come to you as you read this lesson.(note: Hover over the arrow on the right to scroll through images and activate the pop-up descriptions.)
 THE SHAPE OF A BOOK • What Does Baby Want? by Tupera Tupera. One really has no clue that this book will open up into nursing breasts—it remains a surprise until revealed on the last page. |  THE SHAPE OF A BOOK TRANSFORMED BY FLAPS • The Doggy Book by Sara Fanelli opens up and folds out into.... |  ....a life-size pet complete with bone! |
|---|---|---|
 ASSORTED FLAPS • All Mixed Up by Carin Berger creates a whimsical play of word combinations. |  COLOR & SECRET INK! • The Great Journey by Agathe Demois and Vincent Godeau printed in blue ink made invisible to the naked eye by overprinting in red ink. Use a hand held viewer to discover what's inside. |  PERSPECTIVE & POINT OF VIEW • Topsys and Turvys-Number 2 by P.S. Newell reads right side up, then upside down for a second read—originally published in the late 1800's it continues to delight readers today. |
 MOVEMENT • Button by Sara Fanelli has the reader turn the book counterclockwise, a turning motion that emulates the rolling button. |  SHADOW THEATER • Le Petit Chaperon rouge by Charles Perrault and Clementine Sourdais cleverly uses cutouts that create cast shadows similar to light shining through a dark forest. |  CUTOUT • Tree by Britta Teckentrup includes a cutout of the owl at home in the tree visible on every page. The owl stays constant while the tree is in flux with change of seasons and other critters scrambling about. The owl leaves in the end which feel poignant and poetic—a comforting theme of stability through change. |
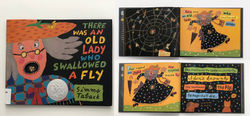 CUTOUTS • There Was an Old Lady Who Swallowed a Fly by Simms Tapback has a dust jacket with a cutout for the mouth. The placement of the cutout on each page is masterful. The top page shows what she juste ate—the fly. And then when you turn that page the cutout shows what she eats next—the spider. |  CUTOUT • The Hole by Øyvind Torseter. The Hole is not only a cutout in this book, but the Hole is actually a character in the book! |  FLAPS • Never Content by Bruno Munari is a series of illustrated animals in action. The reader opens the flap to see what's in the animals' mind. A simple way of illustrating the complex idea that beings can have hidden thoughts. |
 GAME PLAY • Who What Where? by Olivier Tallec plays a question and answer game with the reader which is fun to read. |  TINKERING WITH REALITY • The Enemy by Davide Cali and Serge bloch prints a torn hole in the page of the book to become the hiding spot for each soldier. The actual book is the battle ground, bringing the reader even closer to the action. |
You've just seen examples of books which make use of the following design to great effect. Can they also play a part in your storytelling?
-
Shape of the Book
-
Color
-
Perspective or Point of View
-
Pacing
-
Cutouts, Folds or Flaps
-
The Marking on the Page
-
Scale
-
Medium
Make notes of any ideas that come to mind.
One of my favorite examples of clever storytelling is The Potato King by Christoph Niemann. Niemann uses a photograph of a potato and potato prints to tell the story of how potatoes came to South America. It's remarkable how much Niemann conveys in a potato print. (note: Hover over the image for the description pop-ups at the bottom of the book.)
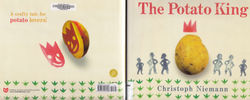 The Potato King by Christoph Niemann |  Using the endpapers to set the scene. |  SCALE • COLOR • BODY LANGUAGE: Look how the color and size make the King a more powerful character, yet his subject is defiant. The story is set. |
|---|---|---|
 EXPRESSION: Remarkable how much expression is conveyed in the the King's smile and body from a potato print! |  GESTURE • RELATION BETWEEN CHARACTERS: Compare the gesture of the King to the gesture of the town people. |  Look at the exaggeration of each character's body gesture. |
 ADDING ADDITIONAL NARRATIVE ELEMENTS: Until this page, Niemann has simplified so much that he only used body gestures to tell the story. Now he adds the cloud and lightening to show the King's rage—escalating the tension. |  FORM: The group of soldiers reveals the building tension. |  SPACING & PROXIMITY OF ELEMENTS TO EACH OTHER: Solidier have completely taken over both the town and the page. |
 SPACING: To illustrating the guarding of the potato, I love the mix of the potato prints and photograph of the potato. Post Modernism in children's books? I haven't heard that as a term, but I think this is what it is! |  |  SURPRISE: A delightful little shift in the struggle. |
 |  The bayonet becomes more useful as a tool to cook the potato. |  BA-BUMP: The last page of a picture book is often used for what I call a ba-bump. You could also think of a snap of the fingers to seal the story. |
 Can you see the King is chuckling to himself as he is leaving the potato field? Niemann uses every bit of space to tell the story. It's also kind of nice to revisit the lively image of the king after seeing his grave on previous page. |
Choosing your Manuscript
I want the course to be flexible—So you have a few options as to what to work on...
• If you have a manuscript you are working on—work with that.
• You can choose something in public domain like a nursery rhyme.
• Often images come first in book creation. You can do the assignments without a manuscript. Think of concepts or themes that you want to work with and see if story ideas come to as you illustrate. If you choose this option:
• Write out a list of 5 themes, subjects, or concepts you want to work on.
• Write 5 questions about each theme along with the answers if you know them.
(This is a great exercise for coming up with new ideas.)
For example my theme might be "circus" and my question about the circus might be: Who is in the circus? And my answer might be: a list of each circus member and what is special about them.
Character
I'm keen to show you how broad the range of a characters can be in a children's book. A dot can be a character, or a line or a leaf can be a character. Here are few unusual examples followed by more typical ones. (note: Again hover over the image to see a description of character elements and use the arrow to scroll through the images.)
 NUMBERS OR LETTERS AS CHARACTERS • Little 1 by Ann & Paul Rand |  SHAPE AS CHARACTER • Triangle by Mac Barnett & Jon Klassen is about Triangle and his friend Square. The back cover is the back of Triangle, which eludes to the possibility that the square you are holding as a book could also be a character... | 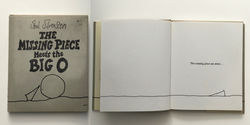 SHAPE AS CHARACTER • The Missing Piece Meets the Big O, by Shel Silverstein, is a simplistic play between shapes in a funny line drawn world. |
|---|---|---|
 SHAPE AS CHARACTER • Pezzettino, by Leo Lionni, is a piece (pezzettino in Italian) looking for it's missing parts. |  SHAPE: Not a Box by Antoinette Portis. | 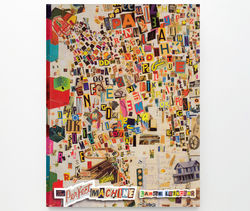 MAIN CHARACTER ISN'T SHOWN • The Perfect Machine, by Lance Letscher, is about a boy hunting for the perfect machine. He is never shown in the book. Instead, the illustrations seem more like the boy's thoughts as he considers different machines. The unseen character turns out to be a perfect machine in the end. The unseen machine potentially includes the reader as a perfect machine. This book is illustrated in the same collage style that Letscher uses in his fine art—unusual for picture books. |
 This is an interior from The Perfect Machine. "He thought of every kind of airplane." The proximity of the airplanes to each other heightens the impact of the illustration. |  COLOR: The Happy Day by Ruth Krauss. All the animals are awake from winter naps and are making their way to the only spot of color. |  COLOR: Extra Yarn by Mac Barnett and Jon Klassen |
 COLOR: The only color in this book is the yarn in a cold hard gray world. |  COLOR: The yarn is knit into colorful sweaters which bring warmth and cheer to the world. |  MARKINGS ON THE PAGE: Wolf, by Sara Fanelli, is about Wolf who is looking for a friend but nobody wants to be friends with a wolf. Fanelli reserves the use of the scratchy "wild" lines for Wolf's character. The other characters have smoother forms of collage. This illustration shows the kids in costume so they don't realize Wolf is a wolf and rejected him. |
 MARKING ON THE PAGE: Fishing in the Air, by Sharon Creech and Illustrated by Chris Raschka, features beautiful fluid lines and bright watery color. |  MARKING ON THE PAGE: The quality of the illustrations reflects the spirit of the text. |  POETIC DETAILS / ACCESSORIES: The Lion and the Bird by Marianne Dubuc. Look what sweet friends these two are— proof is in the hat. |
 POETIC DETAILS / ACCESSORIES /SCALE: Big Words for Little Geniuses, by Susan and James Patterson, and Illustrated by Hsinping Pan. This is merely a list of big words but the illustrations are lovely. The enormous owl and tiny children catches our attention and promises a fun read. |  DETAILS: Look at the mouse holding it's ears—and is that a chanting gnome? The hand lettering is playful and appealing. |  SCALE / PERSPECTIVE: The world seen from a child's perspective—how they must get tired of seeing adults legs! Note how the dog is the same relative scale to the child as the child is to the adult—I love that empathetic use of scale. |
 WHEN ILLUSTRATING CHILDREN: You should know that publishers like to see how you illustrate children. Be sure to include illustrations of children when you are submitting samples. |  BODY GESTURES • How to Make an Apple Pie and See the World, by Marjorie Priceman. There is a wonderful sense of gestures and movement in these characters. The exaggeration of the forms makes creates even more motion. The sense of motion reflects the overall theme of the story; the main character makes an apple pie "the hard way" and travels around the world to collect the ingredients. |  NARRATIVE DETAILS: Here Priceman has added playful details: the cow licking the boy, the girl feeding the cat, others children reaching for other things, the chicken on the table, and the dog balancing the plate. Every character is engaged and active even though this is a scene where they are all suppose to be seated! |
 CONSISTENCY • Here Priceman shows the main character engaged in different activities and at different angles. Once my character is set, I like to do sketches similar to these in order to keep my character consistent throughout the book. Notice that the girl's hat is with her in every illustration even when she is not wearing it. |  EXPRESSION: Wild, by Emily Hughes. Did you ever realize how expressive big eyes can be? While illustrating emotional characters, I try to channel what the character is feeling while drawing the character. My line has more emotion to it when I am feeling emotional, so I channel my own emotions. Sometimes I look in the mirror for expressions or body gestures. I even watch cartoons to find inspiration in exaggerated gestures. |  EXPRESSION OR LACK OF EXPRESSION • Little Red, by Bethan Woollvin is filled with Red's funny, subtle under-reactions to wolf. It's badassness shows through. |
 EXPRESSION: Drawings by Louise Bourgeois. I know this is a little off topic, but I couldn't help myself. These drawings were at the MOMA and I was captivated by how much story is included in the simple line drawings. I wanted to share with you. |  IMAGINATIVE DETAILS: This is not from a children's book, but love this image and all the narrative details. |  IMAGINATIVE DETAILS: Le Machine di Munari by Bruno Munari is a funny fantastical book of machines. |
 CONSISTENCY BETWEEN CHARACTERS • This is the House That Jack Built, by Simms Taback. These quirky characters are typical of Taback's unique style. Appreciate how each character's expression is reflected in the character's body. He was a genius at collaging in little bits of detail. |  EXPRESSION • DETAILS The back cover of Taback's There was an Old Woman Who Swallowed a Fly consists of chart of different types of flies. Wonderful and funny! |  SHAPE • Poem Runs by Douglas Florian. Take a look at these characters and the forms of their bodies. |
 SHAPE / CONSISTENCY OF CHARACTERS: The catcher. Look at the next few images from Florian's book. Each character is distinct, but from the same world. |  The third baseman obviously has a powerful throw. |  Admire Slugger's upper strength! |
 Some characters can really stretch! |  Florian's freedom to exaggerate these body forms is an effective way to illustrate that form can be narrative—look at that rubbery arm! |  The base stealer is so fast, Florian couldn't capture him/her. |
 ANTHROMORPHIZED CHARACTERS: The Little Family's Big Day, by Emily Winfield Martin, features wonderful whimsical characters. |  ANTHROMORPHIZED CHARACTERS: |  CHARACTER TRANSFORMATION: My Teacher is a Monster by Peter Brown. We expect characters to make transformations from the beginning of the book to the end, but this book does that quite literally. Bobby doesn't like his teacher so he sees her as a monster. |
 CHARACTER TRANSFORMATION: Bobby runs into his teacher in the park. After spending some time with her... |  CHARACTER TRANSFORMATION: ...she seems less like a monster—and then not at all. |  CHARACTER TRANSFORMATION: Except sometimes... which loops back to the beginning of the story, making a circle and a nice neat little package. |
So—what informs your characters?
EXPRESSION?
SHAPE?
COLOR?
BODY POSTURE OR GESTURE?
MARKINGS ON PAGE?
ACCESSORIES AND DETAILS?
ACTIONS?
SPACIAL PROXIMITY TO OTHER CHARACTERS?
STYLE OF ILLUSTRATION?
ANTHROPOMORPHISM?
SCALE (as in relation to other things) OR SIZE (as in size on the page)?
Finally, I'm including this retelling of the little red riding-hood story. Tone of the storytelling helps to define Little Red's character—I hope you enjoy it as much as I do.
 Little Red by Bethan Woollvin | 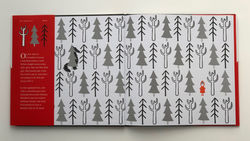 SETTING UP THE STORY: Woollvin uses the every bit of space to tell story. |  SPACIAL RELATION: I love this illustration. Look at this distinction between inside and outside. The open door almost looks like a scary world. |
|---|---|---|
 BODY LANGUAGE: The mother is handing the basket to Red with attitude here. |  SIZE • SCALE • JAGGY SHAPE OF THE WOLF • TEETH • EXPRESSION • UNDER REACTION OF RED: Every element here is adding to the storytelling of these characters. Also look how the background as outline and grays doesn't compete with the characters. |  WIT: Such a clear, witty and crisp depiction with the text. |
 Directly to Grandmas straight forward just like the narrative quality of the words. |  Poor grandma. The editor needs to be behind you in a book like this. Sometimes editors get squeamish about the market, wondering what it will bear. Though this came out after the wildly successful "I Want My Hat Back" with the same sort of darkish humor. All the same it's nice to have a brave editor. :) |  ACCESSORIES: Notice the lipstick? |
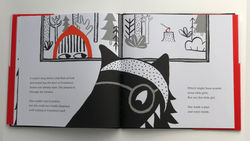 This is an unusual way to crop the wolf. I'm wondering why she made this choice. Maybe to make the wolf look more like grandma? To parallel Red's peering in through window? I think it's interesting. |  UNDERWHELMED RESPONSE: I love the eye roll here on Red. |  The climax... |
 ...continued.... |  ...with a delightful outcome. This is a quick wrap up for a story. But it's so spot on that it feels satisfying. |  Also this page gives us another moment with Red to see her in contact to the wood and ties back to the front endpapers. Also storytelling right up to the end. |

k@kristenbalouch.com | Brooklyn, NY
© 2018 by Kristen Balouch